Backpacking Food
• Dehydrate it Yourself (DIY) •
Eating well in the backcountry is important.
I hope this resource provides nourishment inspiration.
I hope this resource provides nourishment inspiration.
"What food should I pack?" The answer to this question isn't very straightforward. The food to carry with you into the backcountry is highly dependent on several things: terrain (e.g. high alpine, deserts, canyons, jungles), domestic versus international travel, dietary preferences or restrictions, length and intensity of your trip, access to water, and more...
One thing is certain, however... you can dehydrate it yourself (DIY)! This page is dedicated to the dehydration basics for backpacking food curated from nearly a decade of wilderness recipe development. I eat mostly plant-based on the trail, occasionally incorporating ethically sourced fish, eggs, and goat cheese.
One thing is certain, however... you can dehydrate it yourself (DIY)! This page is dedicated to the dehydration basics for backpacking food curated from nearly a decade of wilderness recipe development. I eat mostly plant-based on the trail, occasionally incorporating ethically sourced fish, eggs, and goat cheese.
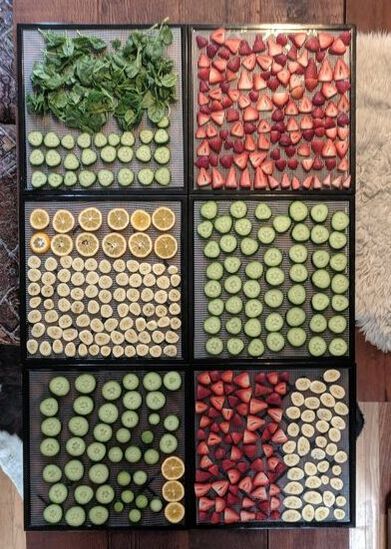
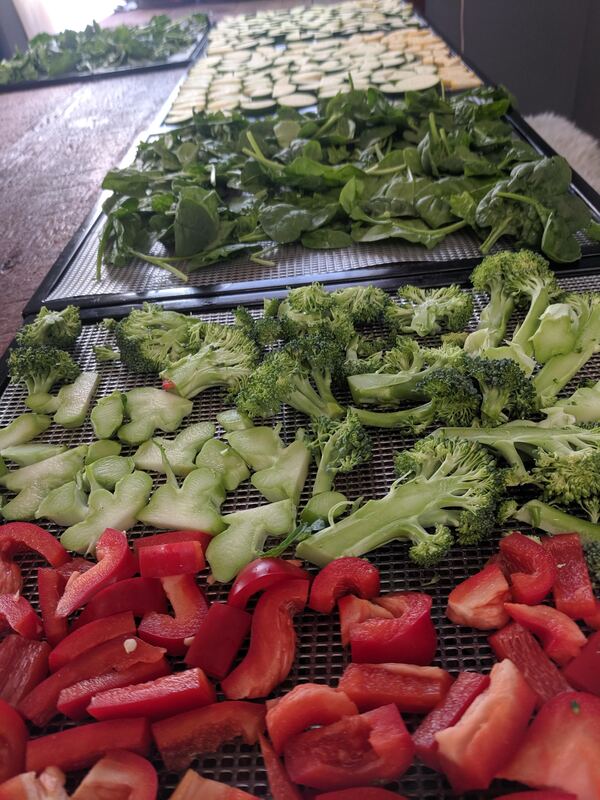
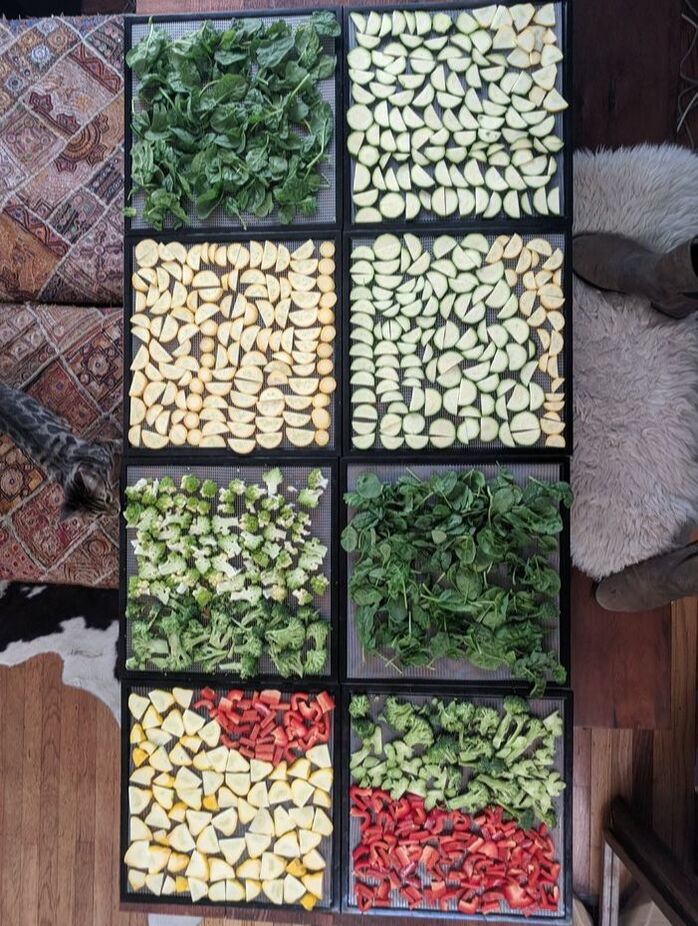
Fruits and vegetables BEFORE dehydration.
|
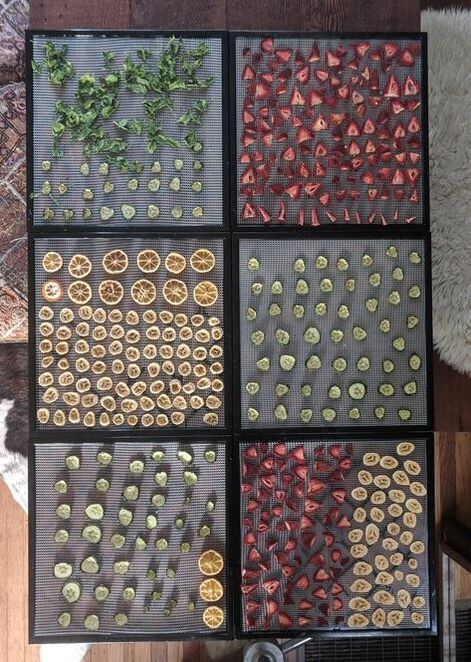
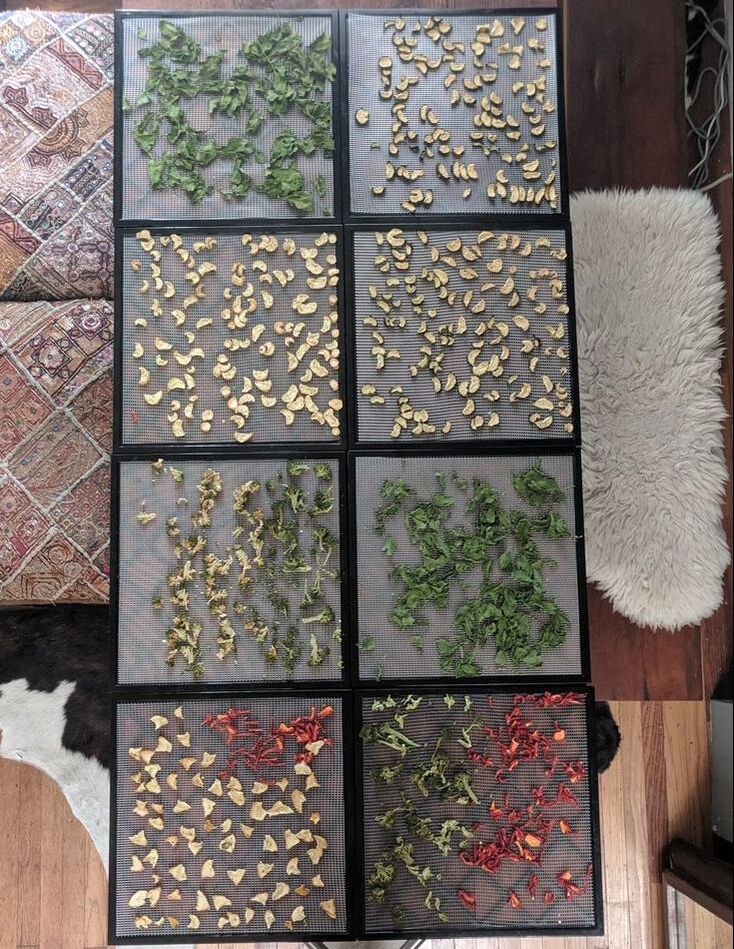
Fruits and vegetables AFTER dehydration.
|
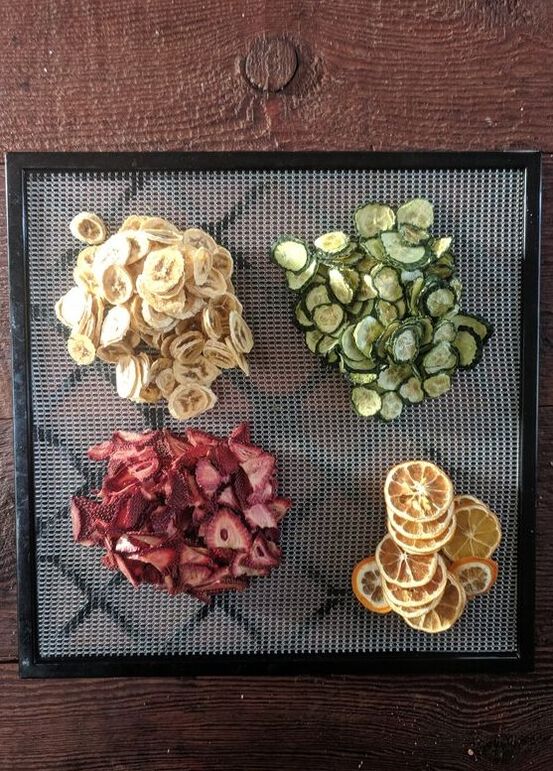
Bananas, cucumbers with sea salt, strawberries, Meyer lemons.
|
There are several reasons to pack dehydrated food you've made yourself. I've listed a few below:
- Save weight & time. Dehydrated food cuts down a significant amount of weight and also speeds up the cooking process, saving fuel and time.
- No scary ingredients. You control all of the ingredients in your dehydrated food. This is important to me as I often avoid conventionally raised dairy and animal products, high-salt foods, added sugar, and preservatives.
- It lasts. If stored properly, dehydrated food can last up to a year or longer, so you can easily spend a weekend creating a storehouse of delicious foods for several seasons of adventures.
- Save money! Dehydrating your own food saves a LOT of money. Prepackaged dehydrated meals range from $6-$16, which adds up when you are hiking for a long time (here's some quick math: 10 days x 3 meals/day x $16 = $480!)
- It tastes like real food. Well, because it is real food. Compared to many of the dehydrated meals I've sampled while backpacking with friends, the stuff I whip up myself is often more appetizing.
- Eat your veggies. Going more than one day without vegetables can drive me a bit crazy, but carrying fresh vegetables is not reasonable. Dehydrated veggies solve that problem.
- No added sugar. Many dried fruits and dehydrated meals have added sugar, which I avoid like the plague.* Drying my own helps with this.
Getting a Dehydrator
Dehydrators can be expensive, but they are well-worth the investment if you backpack often and will dehydrate a lot of food. My top pick is the Excalibur Food Dehydrator for its efficiency, capacity, and ability to modulate the temperature for different food types. Some models even have a built-in timer. I purchased the 3900B 9-tray, no timer model for $75 (what a steal! brand new, this model costs $200) from a friend who was reselling a large inventory. The one downside to the 3900B is the lack of timer, which can create a bit of inconvenience as you have to be present to turn it off.
Models with timers automatically turn off at pre-set times. You can also buy an appliance electrical timer, but why have more stuff? Future us will invest in a model with a timer, a stainless steel case and drying trays, and a clear door. Excalibur offers refurbished models, which can save you money! You can find used Excalibur dehydrators on Craigslist and eBay as well.
In addition, I have four non-stick drying sheets which allow me to easily dehydrate eggs, fruit leathers, sauces, spreads, soups, yogurt, and cooked grains.
Here are dehydrator recommendations from fellow adventurers:
Don't have a lot of extra money to invest in a dehydrator? Not to worry, you can easily dehydrate food without a dehydrator in your oven, toaster oven, microwave, or outside in the sun too!
Getting a Dehydrator
Dehydrators can be expensive, but they are well-worth the investment if you backpack often and will dehydrate a lot of food. My top pick is the Excalibur Food Dehydrator for its efficiency, capacity, and ability to modulate the temperature for different food types. Some models even have a built-in timer. I purchased the 3900B 9-tray, no timer model for $75 (what a steal! brand new, this model costs $200) from a friend who was reselling a large inventory. The one downside to the 3900B is the lack of timer, which can create a bit of inconvenience as you have to be present to turn it off.
Models with timers automatically turn off at pre-set times. You can also buy an appliance electrical timer, but why have more stuff? Future us will invest in a model with a timer, a stainless steel case and drying trays, and a clear door. Excalibur offers refurbished models, which can save you money! You can find used Excalibur dehydrators on Craigslist and eBay as well.
In addition, I have four non-stick drying sheets which allow me to easily dehydrate eggs, fruit leathers, sauces, spreads, soups, yogurt, and cooked grains.
Here are dehydrator recommendations from fellow adventurers:
- Backpacking Chef: Choosing a Food Dehydrator
- Wonderland Guides: Choosing a Countertop Food Dehydrator
- Trail Recipes: Dehydrating 123: Choosing a Good Food Dehydrator
- Ultimate Gear Lists: Ultimate Guide to Dehydrated Backpacking Meals
Don't have a lot of extra money to invest in a dehydrator? Not to worry, you can easily dehydrate food without a dehydrator in your oven, toaster oven, microwave, or outside in the sun too!
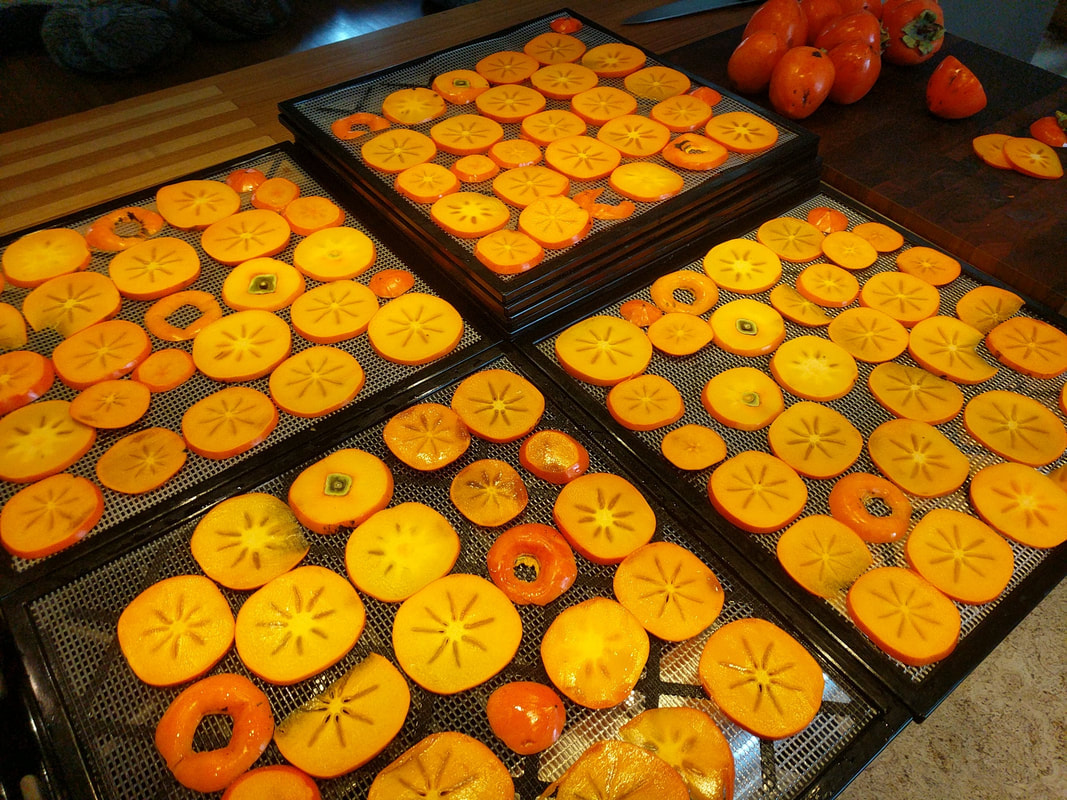
Loading up Excalibur trays with fresh Hachiya persimmons! These are by far my favorite thing to dehydrate... I like to dip the dried persimmons in 100% chocolate for an extra special backcountry treat.
What to Dehydrate
The list is nearly endless. Many folks like to cook up a full meal (e.g. a pot of lentil stew) and dry it on a non-stick liner. This is great for super quick meals in the backcountry. I've done this only a few times and honestly prefer to dehydrate in a way that allows me to prepare meals as I do at home, with individual ingredients used to create cuisines of all sorts along with the spices and various oils I've packed.
Here's a list of my favorite foods to dehydrate:
- Vegetables - arugula, broccoli, cabbage, carrots, cauliflower, cucumbers, kale, spinach, summer squash, sweet peppers, sweet potatoes, Romanesco broccoli, zucchini. I blanch all of these items before drying, except for the spinach and arugula, and dry at 125°F. Drying time varies. Generally, if you typically eat the vegetable raw, there is no need to blanch it. You can also buy frozen vegetables, which are already pre-blanched, to save time on chopping and blanching. You can also roast or grill vegetables before dehydrating, which is my preference.
- Fruit - apples, apricot, bananas, kiwis, Meyer lemons, oranges, peaches, pears, persimmons (both Hachiya and fuyu), plums, strawberries. Some folks recommend dipping fruit in lemon juice before drying at 135°F. The ascorbic acid (the not-so-sexy word for Vitamin C) in lemon juice acts as a natural preservative. I've stopped doing this myself, mostly because I eat my dried fruit pretty quickly. Drying time varies.
- Pesto - make a quick vegan vegan pesto in a food processor (4 lbs fresh basil leaves, 2 cups walnuts, 1 1/2 - 2 cups extra virgin olive oil, 1 Tbsp nutritional yeast, juice of 1 lemon, sea salt to taste) using only about 1/10th the amount of olive oil (use a little bit of water in place of the oil), then spread it across the non-stick drying sheet dehydrate at 135°F for about 7-12 hours, until no longer sticky. You can then pulse it in your food processor or blender into a fine powder. Rehydrate on the trail with both water and olive oil. This goes great with cucumber chips, hummus, and rice crackers for lunch, and can also be added to scrambled eggs for breakfast or with pasta for dinner. It has a short shelf-life, so eat within 14 days of drying, or store in the freezer until use.
- Eggs - here's a great guide to dehydrating eggs from the lovely ladies at Dirty Gourmet and I am hooked! Rehydrate and make for breakfast along with some arugula, dried red peppers, goat cheese, and pesto, or add into rehydrated quinoa/rice and veggies for a fried-quinoa/rice dinner. A friendly reminder, most eggs are produced by hens that live in horrendous conditions and there are many charlatans when it comes to chicken welfare. Buy humane! Check out this egg scorecard to help guide your purchasing. Pasture raised is often the gold-standard, but not all 'pasture raised' hens are treated equally.
- Tempeh - you can buy pre-flavored tempeh or marinate it with coconut aminos, Bragg's, or tamari before dehydrating. You can try pre-cooking it before dehydrating, too, which is my preference. Dry at 125°F for 6-8 hours, or until brittle.
- Fish - canned tuna, canned salmon (can only be stored for 2-weeks), pre-cooked shrimp are great proteins for curry and noodle soup dishes. Dehydrate at 145°F for 6-8 or more hours. Fish is incredibly nutritious, but consume responsibly - 90% of global fish stocks are fully exploited! That's right, 9 out of 10. We're running out of fish on this planet. If you like fish, consider catching it yourself (get a permit), or buying from those that fish responsibly. Here's a printable guide you can take to the market with you.
- Goat cheese - crumble it up and place it on the non-stick drying sheet. It takes a long time to dry (24 hours at 135°F) and is very oily. Eat within 14 days of drying as it has a very short shelf-life. You can also store it in the freeze to help it last longer. Add it to your scrambled eggs for breakfast and in some of your quinoa or pasta dishes for dinner. Or, just eat it as a snack.
- Sauerkraut and kimchee - dry at 125°F for 6-8 hours. Sprinkle the dried stuff on your hummus and crackers, add the kimchee to your ramen dishes for an explosion of umami!
- Coconut or goat yogurt - spread a 5.3 oz container of your favorite coconut or goat yogurt onto one non-stick drying sheet and dehydrated at 120°F for about 20 hours. This takes a long time and is very oily. Add to your morning mueslix and just eat on its own for a snack. This has a very short shelf life, so store it in the freezer until right before your trip and eat within 10 days.
- Cooked grains - cooking and dehydrating grains helps cut down on fuel use in the backcountry. I like to cook and dehydrate quinoa, wild rice, and brown rice. Once cooked, spread evenly on a non-stick drying sheet and dehydrate at 135°F-145°F for 5-10 hours, until bone dry. The higher temperature is required to ensure potential B. cereus infections are avoided, so don't drop below 135°F.
- Cooked beans and legumes - drain and rinse canned or pressure-cooked chickpeas, black beans, pinto beans or lentils, then spread them out on a regular tray and dry at 125°F for 6-8 hours. I've found no difference in quality between canned or home cooked beans.
- Tomato sauce and paste - this is so easy to do, and can add so much to your backcountry dinners. Simply empty the contents of a can of tomato paste or sauce onto a non-stick drying sheet, spread evenly with a spatula, and dehydrate at 135°F for 6-8 hours. The product is leathery and shouldn't be sticky when fully dried, and can be folded up or broken up into pieces.
- Other things! Cooked butternut squash puree, squash soups, hummus, pre-made curry dishes, and lentil stew, are a few things I've been experimenting with, and am really loving! I spread these out as a thin layer on the silicone pads and dry at 145°F until fully dry, then break up into pieces (or blend in the food process or blender into a fine powder) before storing.

|
|
|
Food Safety
Remember to always wash your hands before dehydrating and handling dehydrated food. When preparing for dehydrating, be sure all preparation surfaces and utensils are sanitized. Be sure foods are fully dried before storing, otherwise they can get moldy or go rancid (high fat foods are at higher risk of rancidity). Be very cautious with meats and most animal products as these are the most likely cause illness if not dehydrate properly - meat, chicken and fish should all be pre-cooked prior to drying.
Storing Dehydrated Foods
You can store your dehydrated foods in plastic zip-top bags or large mason jars, and portion out what you need for each trip. I recommend you eat the dehydrated foods within 2-4 months. Longer term storage usually requires an oxygen-free environment, so vacuum sealed bags are an option, as are vacuum sealed mason jars. I haven't tried this yet, but plan to invest in a vacuum and mason lid jar sealer soon. You can also store items in the freezer in freezer safe plastic bags to extend their shelf life.
Foods I Don't Bother Dehydrating
When I was living in the San Francisco Bay Area, I had easy access to the locally-owned Berkeley Bowl and Rainbow Grocery Co-op, which have excellent bulk dried food sections. Generally, natural food stores and food co-ops will have similar sections. When traveling domestically, I often hit up chains likes Natural Grocers, Sprouts Farmers Market, and Whole Foods Market for their bulk dried foods. Given this, I opt to purchasing the following items pre-dried or freeze-dried.
What Not to Dehydrate
Drying foods with a high fat content such as fatty fish and meats, butter, cheese, coconut milk, full fat milk, nuts, olives, avocados, not only take a long time to dehydrate, they also go rancid pretty quickly. You can still dehydrate these foods, just know they won't store for longer than a week or two. I have dehydrated high fat goat cheese, coconut yogurt, and salmon for a long through-hike, but stored it in the freezer after drying and pulled it out right before the trip. I ate the salmon on the first night (it was also pretty smelly, so wanted to avoid a bear-pocolypse!) and the coconut yogurt and goat cheese over the next 10 days, and both tasted great! It is also recommended that you avoid adding oil to your foods when dehydrating for similar reasons.
Dehydration Time & Temperature Guides
There is a lot of variability in the amount of time and temperature at which you dehydrate foods. Both experimentation and the Internet are your friends! I've found this guide particularly useful. For those with an Excalibur, this guide is a good reference. The University of Georgia Cooperative Extension program developed an exceptional and printable reference guide.
Remember to always wash your hands before dehydrating and handling dehydrated food. When preparing for dehydrating, be sure all preparation surfaces and utensils are sanitized. Be sure foods are fully dried before storing, otherwise they can get moldy or go rancid (high fat foods are at higher risk of rancidity). Be very cautious with meats and most animal products as these are the most likely cause illness if not dehydrate properly - meat, chicken and fish should all be pre-cooked prior to drying.
Storing Dehydrated Foods
You can store your dehydrated foods in plastic zip-top bags or large mason jars, and portion out what you need for each trip. I recommend you eat the dehydrated foods within 2-4 months. Longer term storage usually requires an oxygen-free environment, so vacuum sealed bags are an option, as are vacuum sealed mason jars. I haven't tried this yet, but plan to invest in a vacuum and mason lid jar sealer soon. You can also store items in the freezer in freezer safe plastic bags to extend their shelf life.
Foods I Don't Bother Dehydrating
When I was living in the San Francisco Bay Area, I had easy access to the locally-owned Berkeley Bowl and Rainbow Grocery Co-op, which have excellent bulk dried food sections. Generally, natural food stores and food co-ops will have similar sections. When traveling domestically, I often hit up chains likes Natural Grocers, Sprouts Farmers Market, and Whole Foods Market for their bulk dried foods. Given this, I opt to purchasing the following items pre-dried or freeze-dried.
- black bean soup
- blueberries (freeze-dried)
- coconut milk powder
- corn chowder
- falafel mix
- goldenberries
- hummus
- lentil soup
- mulberries
- mushrooms, so many types!
- nuts and seeds
- pea soup
- raisins
- raspberries (freeze-dried)
- seaweed - I love wakame, nori, and kombu
- tomatoes
What Not to Dehydrate
Drying foods with a high fat content such as fatty fish and meats, butter, cheese, coconut milk, full fat milk, nuts, olives, avocados, not only take a long time to dehydrate, they also go rancid pretty quickly. You can still dehydrate these foods, just know they won't store for longer than a week or two. I have dehydrated high fat goat cheese, coconut yogurt, and salmon for a long through-hike, but stored it in the freezer after drying and pulled it out right before the trip. I ate the salmon on the first night (it was also pretty smelly, so wanted to avoid a bear-pocolypse!) and the coconut yogurt and goat cheese over the next 10 days, and both tasted great! It is also recommended that you avoid adding oil to your foods when dehydrating for similar reasons.
Dehydration Time & Temperature Guides
There is a lot of variability in the amount of time and temperature at which you dehydrate foods. Both experimentation and the Internet are your friends! I've found this guide particularly useful. For those with an Excalibur, this guide is a good reference. The University of Georgia Cooperative Extension program developed an exceptional and printable reference guide.
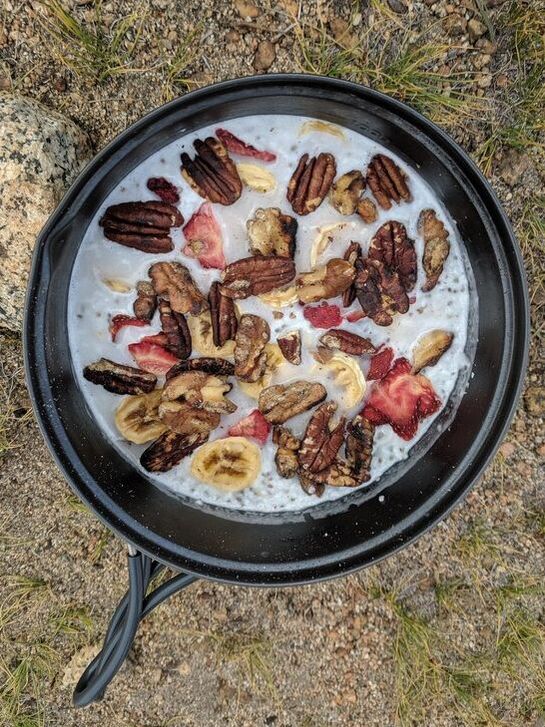
Oats, shredded coconut, flax and chia seeds with dried coconut milk powder, pecans, toasted walnuts, and dehydrated bananas and strawberries.
|
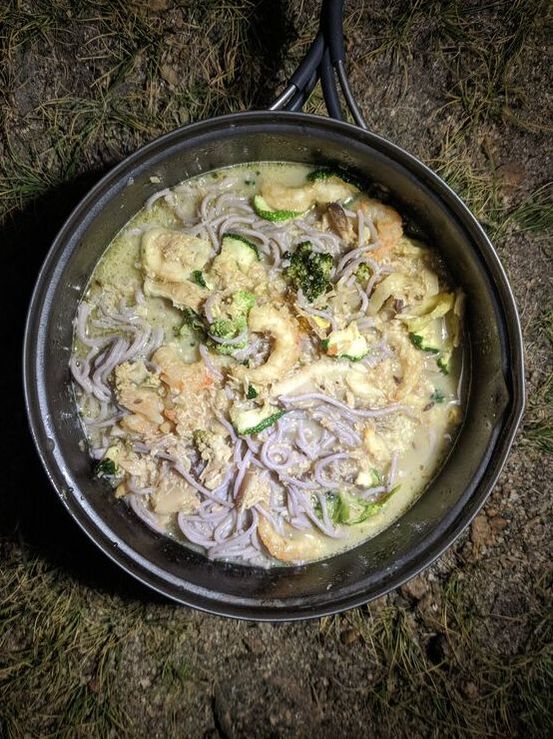
Buckwheat soba noodles with, vegetable bouillon, Thai curry paste, coconut oil, dried coconut milk and dehydrated shrimp, tuna, broccoli, summer squash and zucchini.
|
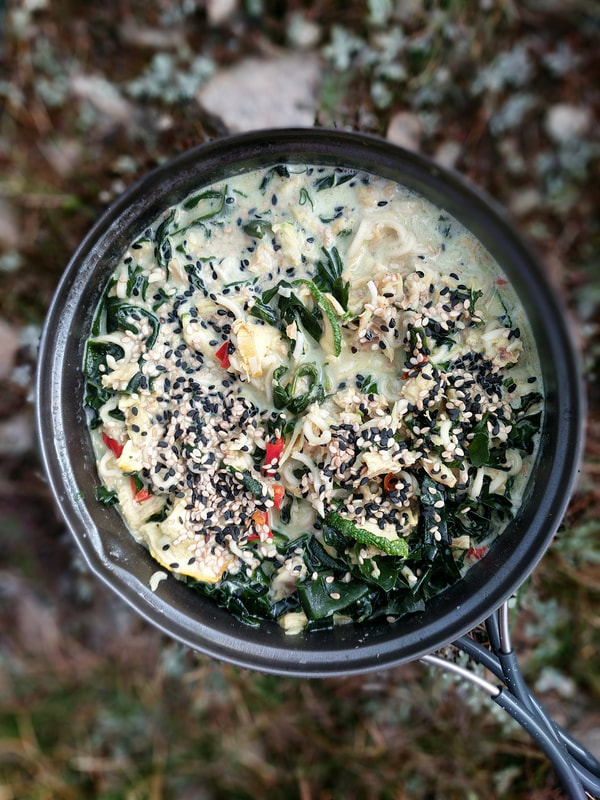
Wide rice noodles with dried coconut milk, vegetable bouillon, dried wakame, sesame oil, black and white sesame seeds and dehydrated tuna, zucchini, summer squash and red peppers.
|
Bringing It All Together: Rehydrating and Meal Planning
Carry additional seasonings and staples with you to facilitate the cooking process, including bouillon cubes, dried herbs and spices, seasoning, condiments, oils and noodles. It usually takes about one part hot water to fully rehydrate one part of dehydrated food (e.g. 1 cup hot water to 1 cup cooked dehydrated quinoa), but every item can be different. Start by adding boiling water to your veggies and proteins, allowing them to sit in the pot for about 5 minutes. You can then sauté them in whatever oil and seasonings you packed, adding in additional hot water and grains at the end.
Here's a sample menu from a 10-day High Sierra through-hike to give you an example of how to incorporate dehydrated foods into backcountry meal planning.
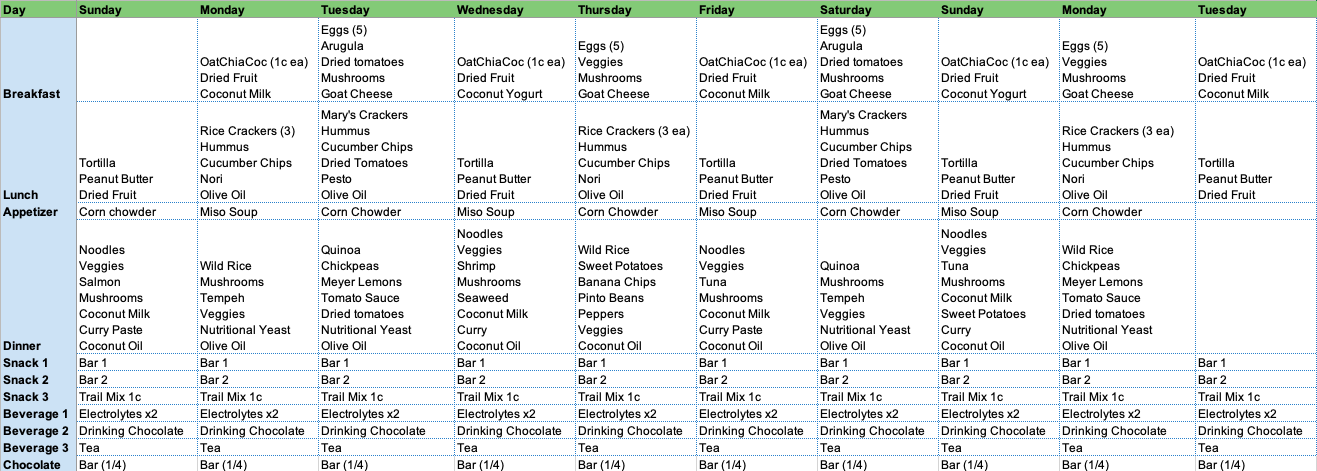
In this 10-day sample menu, I incorporated dehydrated foods into breakfast, lunch, and dinner.
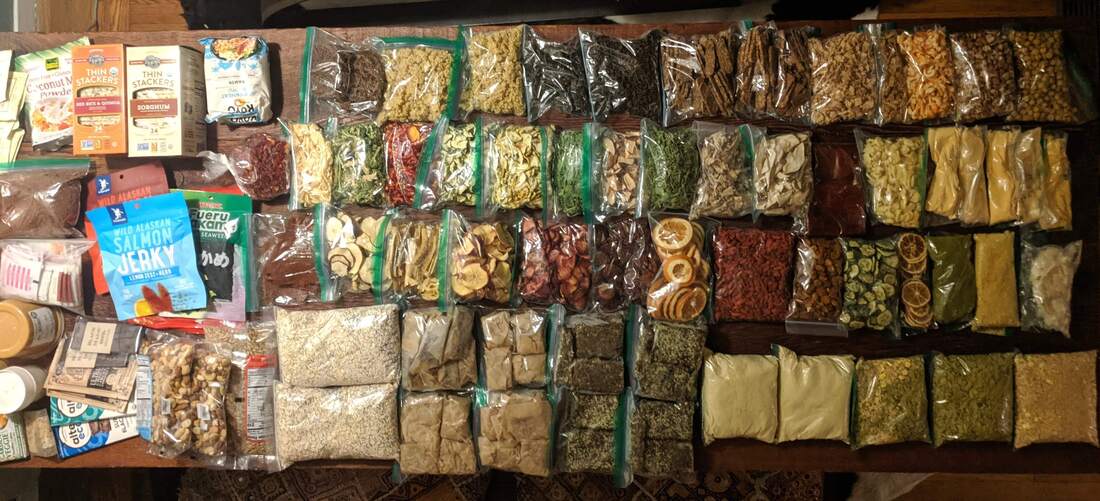
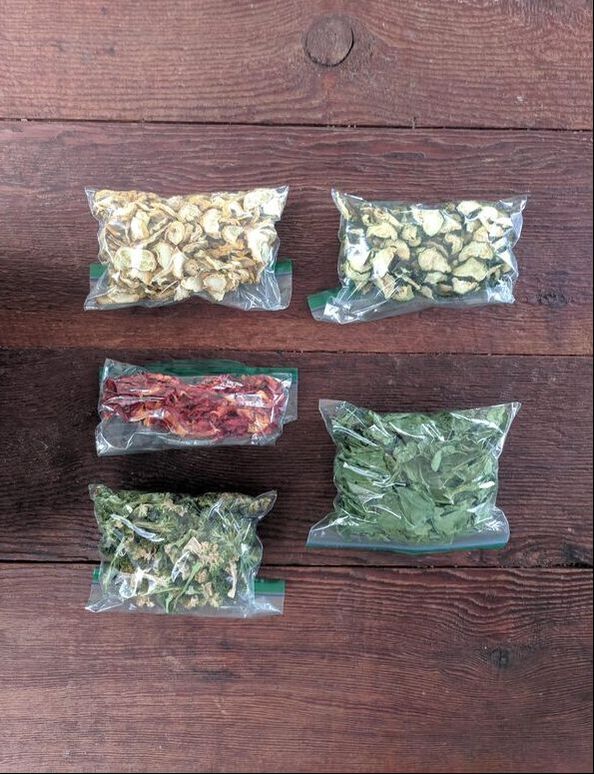
These are all of the foods from the above menu–for two people–packed and ready to go for a 10-day High Sierra through-hike. Many of the items I dehydrated are in the top three rows of plastic bags.
Dehydrating Food Resources
I've done a lot of research on dehydrating food and have perused the web for other recipes. Here's a few of my favorite resources!
Dehydration Basics:
Dehydrating Food Online Tutorials and Classes:
Dehydrated Food Recipes:
I've done a lot of research on dehydrating food and have perused the web for other recipes. Here's a few of my favorite resources!
Dehydration Basics:
- Dehydrator Blog: Dehydrating Time & Temperature Guide: Fruits, Vegetables, Meat, Herbs, Spices & Leather
- Excalibur: Intro to Dehydrating
- Penn State Extension: Let's Preserve: Drying Fruits & Vegetables (Dehydration)
- University of Georgia Cooperative Extension: Preserving Food - Drying Fruits and Vegetables
- REI Blog: How to Dehydrate Food: Fruits, Vegetables, Meat & More - this one is highly recommended and very comprehensive with step-by-step photos and a few recipes, too.
Dehydrating Food Online Tutorials and Classes:
- Dehydrate2Store - includes videos, books, recipes, tips and more.
- HowToWilderness: Dehydrating Food
- TrailRecipes Food Dehydration Class - this $12 class contains a set of fully illustrated, comprehensive guides with step-by-step photographs. It contains 35+ lessons with easy-to-follow instructions for dehydrating everything from fruit and vegetables to meat, fish, pasta and cooked grains.
- California Master Food Preservers - in-person food preservation classes may happen in your county, including classes on dehydrating. This website also has some great resources on food safety.
Dehydrated Food Recipes:
- A Taste of Trace: Homemade Vegan Backpacking Meals
- Dehydrator Blog: 60+ Vegan Backpacking Dehydrator Recipes
- Dirty Gourmet: Backpacking Recipes - I am especially grateful for their dehydrated eggs guide
- Joybilee Farm: How to Dehydrate Cheese for Long-Term Storage
- REI Blog: Backpacking Recipes
- Trail Recipes: Vegan Backpacking Food - they also have a dehydrated food collection, and a collection for a variety of dietary preferences including gluten-free, keto, paleo and more.
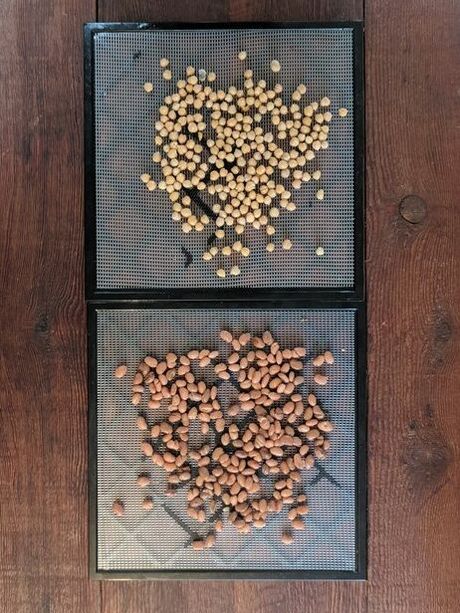
Canned chickpeas and pintos beans BEFORE drying.
|
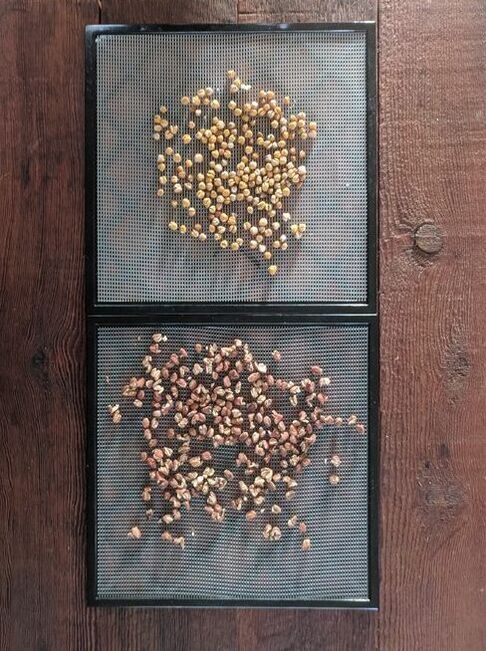
Canned chickpeas and pinto beans AFTER drying.
|
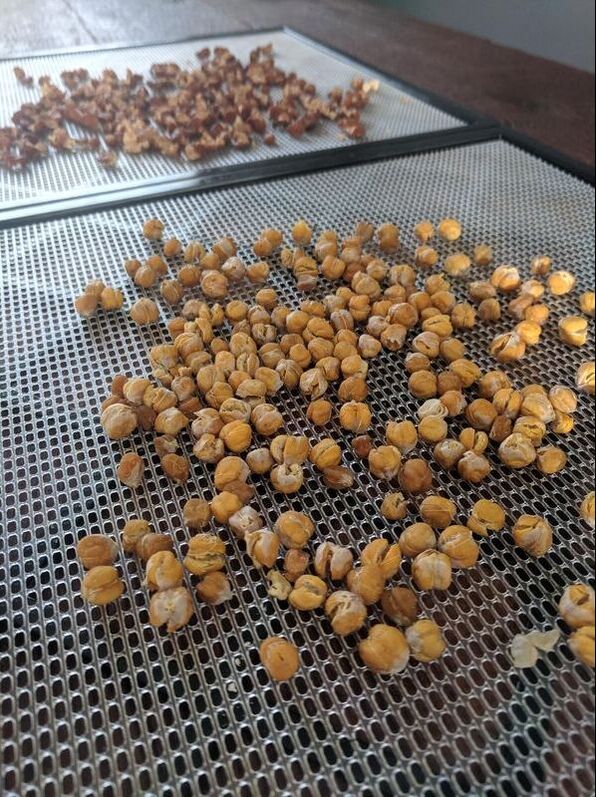
Getting up close and personal with my dried canned chickpeas and pinto beans!
|
Happy dehydrating, adventure friends!
Don't hesitate to reach out if you have any other tips and tricks, or questions!

Where is one of the best places to rehydrate pesto and hummus during your lunch break? Six days into a ten day through-hike, at 12,000 feet, deep in the high Sierra Ionian Basin of course!
